UKAD's Guide for The SSL Purchase Automation

UKAD's Guide for The SSL Purchase Automation

As each software development company, from time to time we pay some attention to SSL certificates. Such protection is a de-facto standard of modern web development as well as a very good practice which requires a constant expenditure of time and effort.

To use the SSL certificate we have to:

  1. Find a provider, which sells certificates
  2. Generate CSR
  3. Send it to the provider
  4. Proof the domain ownership
  5. Get the certificate
  6. Optionally, transform it into the needed format, eg. PEM from to PKCS#12
  7. Install it to the web server.

It seems to be easy when we have several projects at work. But what should we do if there are several dozen projects? And each consists of dev, staging, and production environments. In this case, we may try to automate this process. So, I want to describe the way to automate SSL purchase and share a solution that may reduce the time spent on this work. This article consists of my original research and experiments, as well as some instructions for easy implementation.

But be aware! As soon as UKAD provides mostly .NET development and related services, this article is Windows-oriented, so ACME client and whole procedures with it are described in the following way. With other operating systems it may differ a bit.

Introduction

We represent a company with URL company.tld

Project X is one of our projects, working on which I decided to reduce time spends. This project has four environments: dev, test, staging, and production. Dev and test are located on our side, while staging and production are located on the customer's side.

The thing is that Project X has a large number of modules that are developed as subdomains.

So, we have the following situation:


Dev

Test

Staging

Production

projectX.dev.company.tld

projectX.test.company.tld

staging.projectX.tld

projectX.tld

module1.projectX.dev.company.tld

module1.projectX.test.company.tld

module1.staging.projectX.tld

module1.projectX.tld

module2.projectX.dev.company.tld

module2.projectX.test.company.tld

module2.staging.projectX.tld

module2.projectX.tld

...

...

...

...

moduleN.projectX.dev.company.tld

moduleN.projectX.test.company.tld

moduleN.staging.projectX.tld

moduleN.projectX.tld


For production, the purchased wildcard certificate is used, there are no questions. But it covers only the first level of the subdomain. So, if there is a certificate for * .projectX.tld, it will work for staging.projectX.tld, but for module1.staging.projectX.tld it already does not. But I don’t want to buy a separate certificate .

And it is just the only one project, while we have many more.

The common reasons to spend some time on implementation are

  • Some time ago, Google proposed reducing the maximum validity period of SSL certificates with all the consequences.
  • Facilitating the process of issuing and maintaining SSL for the internal needs of projects and the company as a whole.
  • Centralized storage of certificate entries, which partially solves the problem of domain verification using DNS and subsequent automatic updates, and also solves the issue of client trust. Nevertheless, CNAME records on the partner/contractor company resource cause more trust, than if they are made somewhere on a third-party one.
  • Finally, in this case, it's really better to have than not to have.

Choosing an SSL provider and the other preparatory steps

Of the available options for free SSL certificates, Cloudflare and Letsencrypt were considered. The DNS for this (and some other projects) is hosted on Cloudflare, but I'm not a fan of using their certificates. Therefore, it was decided to use Letsencrypt.

To create a wildcard SSL certificate, we must confirm ownership of the domain. This procedure involves the creation of some DNS records (TXT or CNAME), with its subsequent verification when issuing a certificate. Linux has a utility called Certbot, which allows us to partially (or completely for some DNS providers) automate this process. I chose WinACMEfrom the well-known ACME clients for Windows.

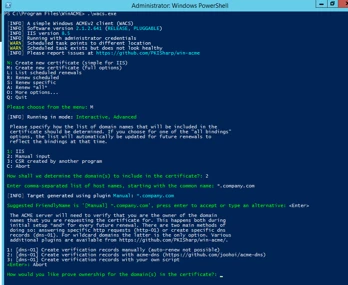
As the A record for the domain is created, we proceed to the creation of the certificate:

SSL Purchase Automation 1

We will at the last part, namely, the available options for verifying domain ownership for issuing a wildcard certificate:

  • Creating verification records manually (automatic updating is not supported)
  • Creating verification records with acme-dns server (more details can be found here.
  • Creating verification records using our script (analog of Cloudflare plugin for certbot).

At first glance, the third point is quite suitable, but if the DNS provider does not support this functionality? But we need a general case. And the general case is CNAME records, all of NS providers support them. Therefore, we pick the second point and go to configure our ACME-DNS server.

ACME-DNS server configuration and certificate issue process

For example, I created the 2nd.pp.ua domain, and in the future, I will use it.

A prerequisite for the correct operation of the server is the creation of NS and A records for its domain. And the first unpleasant moment I came across - Cloudflare (at least in free use mode) does not allow us to simultaneously create an NS and A record for the same host. Not that it was a problem, but it is possible with bind. Support replied that their panel does not allow this. It's not a big deal, create two entries:

acmens.2nd.pp.ua. IN A 35.237.128.147
acme.2nd.pp.ua. IN NS acmens.2nd.pp.ua.

At this step, there should be resolved host acmens.2nd.pp.ua.

$ ping acmens.2nd.pp.ua
PING acmens.2nd.pp.ua (35.237.128.147) 56(84) bytes of data

But acme.2nd.pp.ua won't be resolved since the DNS server that maintains it is not yet running.

Records are made, go to configure and run ACME-DNS server. I will have it live on the ubuntu server in the docker container, but we can run it wherever there is golang. Windows is fine too, but I still prefer a Linux server.

Create the necessary directories and files:

$ mkdir config
$ mkdir data
$ touch config/config.cfg

We will use a text editor and insert the sample configuration into config.cfg.

To succeed, just change the general and api sections:

[general]
listen = "0.0.0.0:53"
protocol = "both"
domain = "acme.2nd.pp.ua"
nsname = "acmens.2nd.pp.ua" 
nsadmin = "admin.2nd.pp.ua" 
records = 

    "acme.2nd.pp.ua. A 35.237.128.147",

    "acme.2nd.pp.ua. NS acmens.2nd.pp.ua.",
                                            ]
...
[api]
...
tls = "letsencrypt"
...

We also can create a docker-compose file in the general directory of the service:

version: '3.7'
services:
  acmedns:
    image: joohoi/acme-dns:latest
    ports:
      - "443:443"
      - "53:53"
      - "53:53/udp"
      - "80:80"
    volumes:
      - ./config:/etc/acme-dns:ro
      - ./data:/var/lib/acme-dns

Let's run it!

$ docker-compose up -d

At this stage, acme.2nd.pp.ua host should be resolved, and 404-status should be returned on https://acme.2nd.pp.ua

$ ping acme.2nd.pp.ua
PING acme.2nd.pp.ua (35.237.128.147) 56(84) bytes of data.

$ curl https://acme.2nd.pp.ua
404 page not found

If it doesn't, use docker logs -f <container_name>! Logs aren't difficult to read.

We can start the certificate creation. Open powershell as administrator and run winacme. We are interested in the following options:

When it asks ACME-DNS server link, just input the server's URL. Eg URL of the acme-dns server: https://acme.2nd.pp.ua

In response, the client creates an entry that must be added to the existing DNS server (one-time procedure):

[INFO] Creating new acme-dns registration for domain 1nd.pp.ua

Domain:              1nd.pp.ua
Record:               _acme-challenge.1nd.pp.ua
Type:                   CNAME
Content:              c82a88a5-499f-464f-96e4-be7f606a3b47.acme.2nd.pp.ua.
Note:                   Some DNS control panels add the final dot automatically.

                           Only one is required.

Then we create the necessary entry, and make sure that it was created correctly:

SSL Purchase Automation 2

$ dig CNAME _acme-challenge.1nd.pp.ua short
c82a88a5-499f-464f-96e4-be7f606a3b47.acme.2nd.pp.ua.

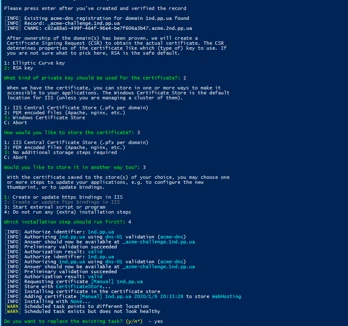
Then we continue the process of creating the certificate:

SSL Purchase Automation 3

How to use certbot as a client is described here.

This completes the process of creating a certificate, we can install it on a web server and use it. If, when creating a certificate, a task in the schedule is also created, then in the future the certificate renewal process will occur automatically.

  • DevOps
  • Security
Back to Articles